Behavior Designer Pro
Asset Store Link: Behavior Designer Pro
About
Behavior Designer Pro is an asset that allows you to create behavior logic for AI agents using behavior trees. While the behavior tree is a visual interface, this is different from visual scripting, as you are still writing most of the code logic that is running; however, the layout of the behavior tree will determine the behavior of the agent based on conditions and actions defined in the tree.
Behavior Designer has been a successful asset on the Unity Asset Store for several years now, but in 2025 Opsive released a new Pro version of the asset that is powered by Unity's Data Oriented Technology Stack and integrates with Unity's Entity Component System. The asset is fully compatible with both ECS-based and GameObject-based projects.
DOTS Survivors is an excellent project to test out Behavior Designer Pro to create some new enemy types. I had a ton of fun creating these new enemies that seem a bit smarter than the standard enemy AI (if you can call "following the player" "AI") and makes the game feel much more alive. Read on to see how you can load these new integrations into your project!
Also, if you want to learn more about Behavior Designer Pro and how it came to be, here is my interview with Justin the founder and lead developer of Opsive who created Behavior Designer and Behavior Designer Pro.
DOTS Behavior Trees w/ Justin (Opsive) - The Hot Path Show Ep. 54 - YouTube
Setup
- Download and Import the latest version of Behavior Designer Pro from the Unity Asset Store
- I Imported all project files aside from the Samples directory
- If you are using a custom Assembly Definition, add a reference to
Opsive.BehaviorDesigner.Runtimein your Assembly Definition Asset to reference the Behavior Designer API from your game code.- The DOTS Survivors Assembly Definition is located at
Assets\DOTSSurvivors\Scripts\DOTSSurvivors.asmdef
- The DOTS Survivors Assembly Definition is located at
- Visit the Behavior Designer Pro Documentation Site to understand the basics of behavior tress and how to use the asset.
Note
If you wish to use the Behavior Designer Pro integrations developed for DOTS Survivors, extract the .unitypackage file located at: Assets\DOTSSurvivors\Integrations\BehaviorDesigner.unitypackage
IMPORTANT: doing this will overwrite the following files:
- EnemyType.cs
- Spawn Wave ScriptableObjects:
- EnemySpawnWave-4.asset
- EnemySpawnWave-7.asset
- EnemySpawnWave-9.asset
- EnemySpawnWave-12.asset
- EnemySpawnWave-19.asset
Be sure you have a backup of these files if you made any modifications to them.
Usage in DOTS Survivors
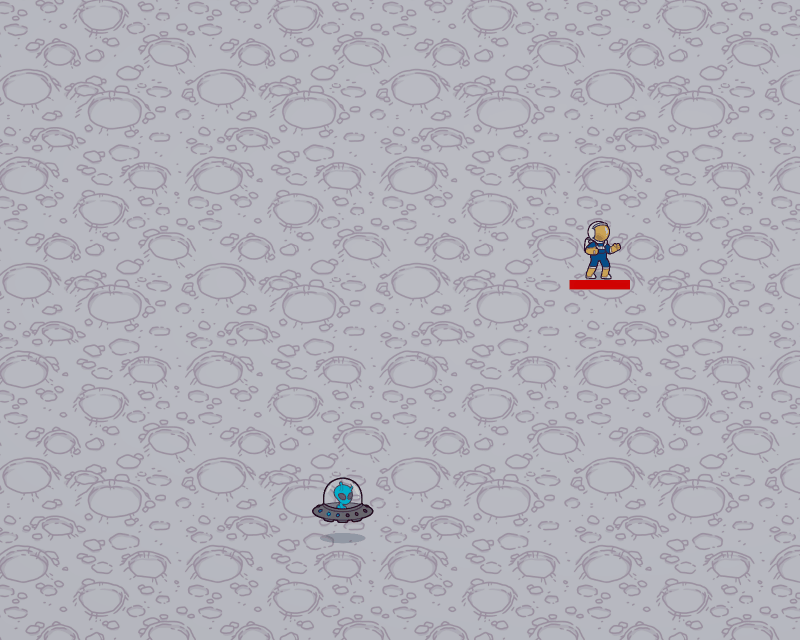
For DOTS Survivors, I wanted to add some more enemy types that have interesting behaviors, rather than just the standard "chase the player and attack on collision." So I've created two new enemy types: one that will explode near the player, and one that will shoot a projectile towards the player.
This was my first time using Behavior Designer Pro (or using any type of behavior trees for that matter!), so there was a bit of a learning curve to get up and running. But as I played around with things more and more I got a much better idea of how to create new nodes and how they all interact in the scope of a complete behavior tree. By the end I was extremely satisfied with how easily I could create all sorts of new behaviors with the provided nodes and custom ones I created. As I sit here writing this, I'm feeling a bit inspired to make a bigger project with a bunch of these behavior trees!
Exploding UFO Enemy
For the first enemy type I created, I wanted to make something simple to understand the basics of creating custom nodes and behavior trees. I wanted this enemy type to spawn offscreen, move towards the player, once it gets close to the player, it will begin to flash to indicate it is about to explode, finally I want it to explode and deal damage to the player if it is within a defined radius of the explosion.
Luckily, this behavior is fairly similar to the "Swarm Agents" in the Entities sample included with Behavior Designer Pro, so I had a basic structure to go off of. Here is the final behavior tree for this enemy type:
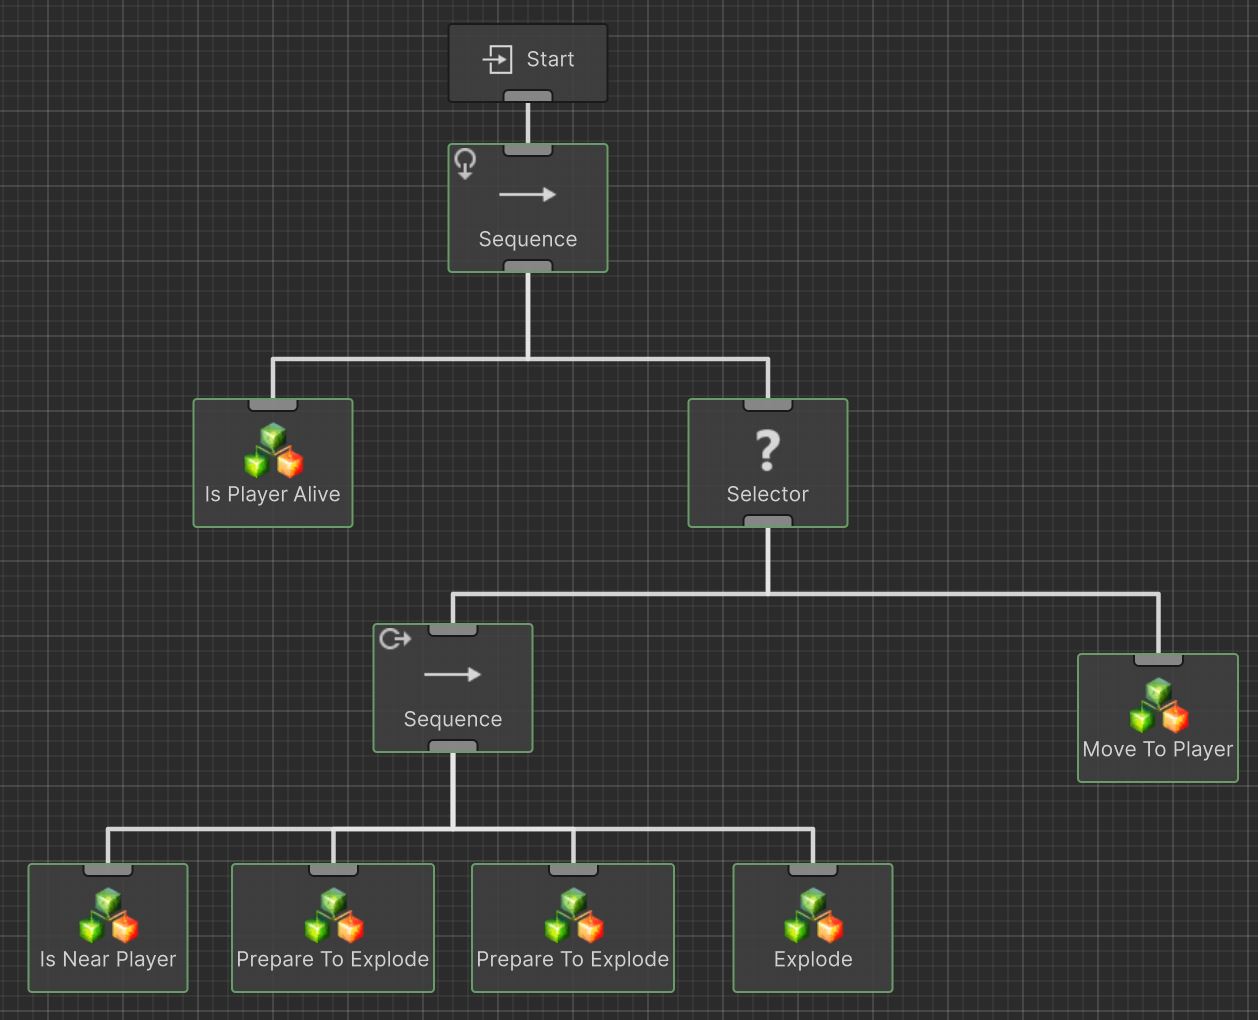
Behavior trees are evaluated top-to-bottom then left-to-right, so let me go through the logic sequence.
The Start node feeds into a Sequence node, this node type is built-in to Behavior Designer and is effectively an "and" gate, meaning it will only return true once all below conditions are satisfied. The down arrow icon in the upper left is important, but I will return to that later.
The left-most node of the initial sequence is Is Player Alive which is a custom "conditional" node type that I created. As you can imagine, this node returns true if the player is alive, and false if the player does not exist in the game. I have this node so the remainder of the logic only runs if the player is alive. This was the first custom node type I created, and I was able to reference the Is Turret Alive node in the Behavior Designer Pro samples project to figure out how to set this up.
The right node of the initial sequence is a Selector node, which is another built-in node type. This one is similar to the Sequence node, however it can be thought of as an "or" gate, which returns true when only one of the child branches returns true.
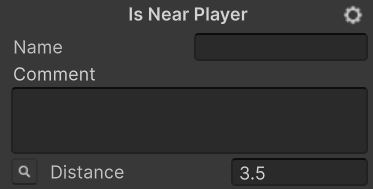
So first, the left branch is evaluated, in this case I have another Sequence node, so we will look at the left-most node of that child branch, which is the Is Near Player node. This is another custom conditional node type I created which returns true when the enemy is within a defined distance of the player. For this, I've exposed a Distance variable in the Behavior Designer Node Inspector which allows me to set the value in the editor.
Note
You can right click on any node, the click "Edit Script" to view the source code to see how it works.
Moving on, when the enemy spawns, the enemy will not be near the player, so the Is Near Player node will return false. As it is under a Sequence node, all child nodes must return true in order for that to return true, so the Sequence node returns false. So we walk back up the tree to the Selector node, as this is an "or" evaluation, we will evaluate the right node now.
This is the Move To Player node, which is a custom "action" node type I created. The logic of this node, will determine the position of the player and the direction the enemy needs to move in to travel to the player. This utilizes the same enemy movement logic as the standard enemy types by setting the movement direction in the CharacterMoveDirection component.
I've setup Move To Player to always move the enemy towards the player and never return a status of true or false. So that means this node will run indefinitely on its own. So how do we get this to stop to run the remainder of our behavior logic? Well that is where the little icons in the upper right of the Sequence nodes come into play.
This icon defines the "Conditional Abort" behavior of the nodes. As a performance optimization, not all nodes in a tree are evaluated every frame. So, we need a way to define when certain nodes should be reevaluated. Looking at the lower Sequence node, this one has a right arrow icon, which represents the "Lower Priority" conditional abort type. This means that this node has the ability to interrupt actions that have lower priority if the condition of a node with higher priority evaluates to true.
In this case, while the enemy is moving towards the player, the Is Near Player node is also being evaluated, once Is Near Player returns true, this will abort the Move To Player action and continue with the higher priority sequence.
Before continuing on, I'll just mention the other conditional abort type which is the "self" abort type, indicated by the down arrow as seen on the upper Sequence node. This means this has the ability to abort things below it as conditions change.
In this case, the Is Player Alive node is being evaluated, if this were ever to return false, any behavior running in the right side of the tree would be aborted until Is Player Alive returns true again. Inside Is Player Alive I have some logic to stop movement of the enemy if the player entity is ever destroyed.
Note
The concept of conditional aborts were a bit confusing to me at first, but I would highly recommend experimenting around with them for yourself to get a better idea of how they change the behavior of your agents.
Justin's video and documentation on the topic was also quite helpful: Conditional Aborts
Returning to the bottom sequence, once Is Near Player returns true, the Prepare To Explode node will immediately execute. This is another custom action node type that I created. This node causes the enemy to flash a certain color for a few seconds to indicate to the player that this enemy is about to explode. I've exposed variables for the color, flash duration, and flash frequency. Entering the Prepare To Explode node will also cause the enemy's movement to stop.
I have two of these Prepare To Explode nodes that run one after another. The first will slowly flash the UFO orange for 2 seconds. After the 2 second duration, that node returns true and goes to the second Prepare to Explode node which will rapidly flash the UFO red for 1 second. This gives a nice little effect where the player can better tell when the UFO is actually about to explode, giving them an opportunity to try an get away.
After the second Prepare To Explode completes, the Explode node will execute. This is another custom action node which will spawn an explosion at the position of the UFO and simultaneously destroy the UFO. In the Explode node properties, you can set the radius of the explosion and the hit points to deal to the player character. I wasn't able to find a way to set an entity prefab reference for the explosion entity through the Node Inspector, so I just needed to create a simple authoring component and store that on the UFO entity.
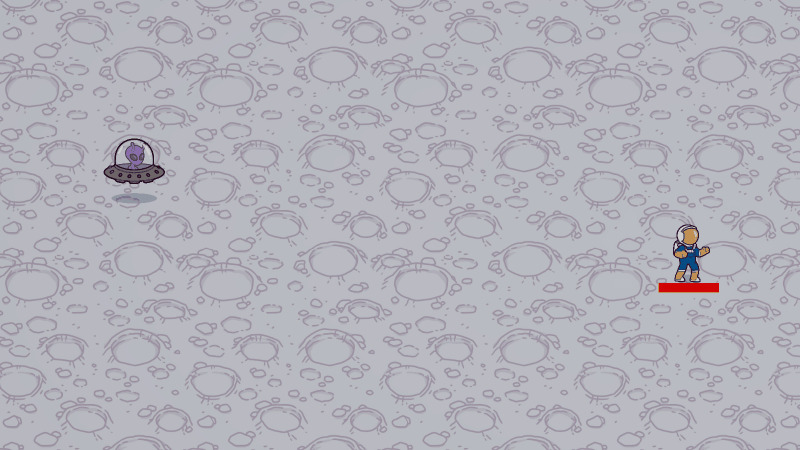
Projectile UFO Entity
For the second custom enemy type, I wanted to add something a bit more complex. Here is the logic I came up with for this enemy type:
- Spawn the enemy offscreen and begin moving towards the player
- Once the player is in range
- Stop movement and indicate that the enemy is about to shoot towards the player
- Shoot a projectile towards the player
- Wait in place for a moment
- Regardless of if the player is in range, move towards the player for at least a second
- Repeat this entire logic as long as the enemy exists
This is the final behavior tree I came up with to implement this:
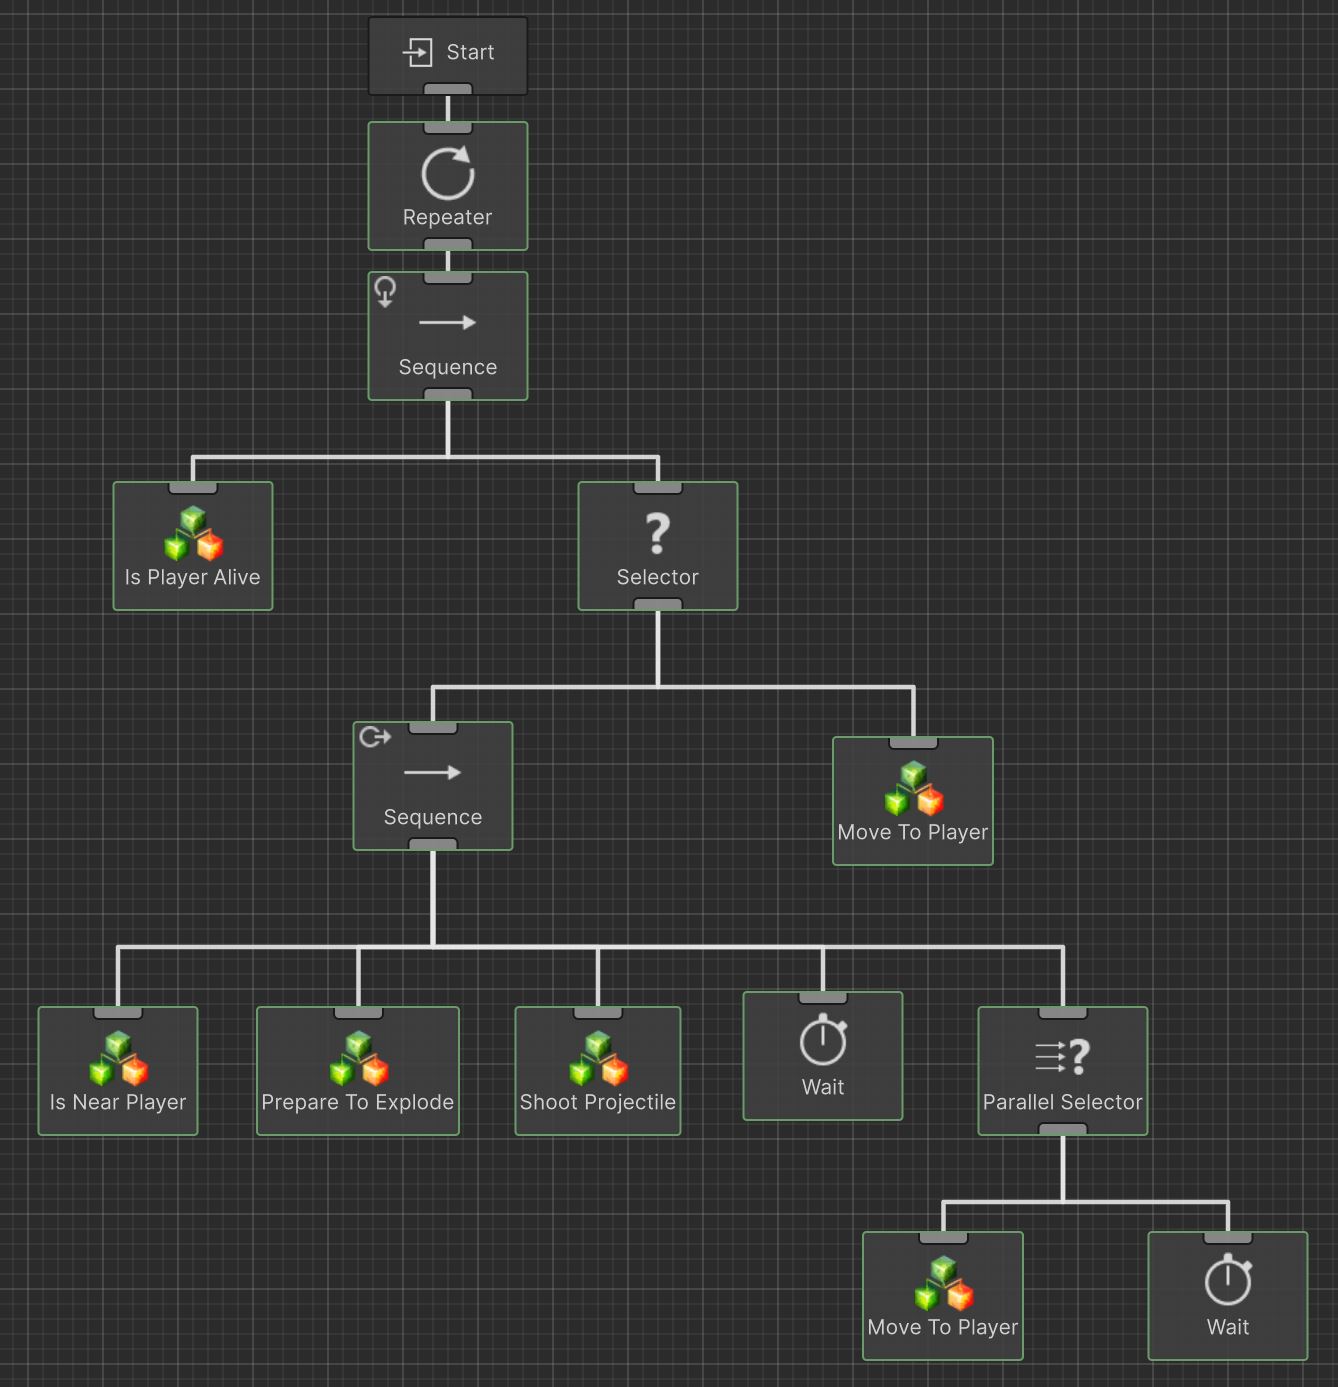
As you see, it has a fairly similar structure to the exploding UFO and I was even able to reuse a bunch of the custom nodes I created for that one! This was one thing I really liked about Behavior Designer Pro is that once I had a set of nodes created, I was able to reuse those in different orders/combinations to create completely different AI logic.
Taking things from the top, I'm going to skip over the Repeater node for now, as that will be more relevant at the end. After that you see we go into a Sequence node with a self abort type and branches of Is Player Alive and Selector, same as the exploding UFO. Again, this logic should only run if the player is alive.
The Selector node is also setup similar to the exploding UFO in that our core logic sequence (right branch) has a higher priority than moving towards the player. Due to the lower priority conditional abort type on the Sequence node, the UFO will stop moving towards the player once they are within a defined range the player. The Is Near Player node is the same as the exploding UFO, but I have the defined range as further away so the enemy doesn't need to get so close before firing a projectile.
Next I was able to reuse the Prepare To Explode node to indicate when the enemy is about to shoot. As these projectiles should be telegraphed a bit more subtly than the big explosion, I have the UFOs flash pink at a medium rate for 1 second before firing the projectile.
Then the Shoot Projectile node will execute. This is a custom action node that will determine where the player is and fire a red projectile in their direction. Similar to the explosion, I needed to create a separate component and authoring script to store a reference to the projectile prefab.
After that I utilize the built-in Wait node to wait for 1 second before proceeding. In the lore of the game, maybe you can think the alien is moving his hands from the weapon controls to the flying controls. It makes it feel a bit more natural if there is a slight pause after shooting before he starts moving again.
Next we will go to the Parallel Selector node. This is a cool built-in one that will execute all child nodes until one of them returns true. This is opposed to the standard Selector node that will execute one branch at a time. The children of this node are Move To Player and Wait, the latter node being set to a value of 1 second. This means that regardless of if the player is already within range of the enemy, it will still continue to move towards the player.
This is a super small thing, but again I feels much more alive to have it continually reposition itself after each shot rather than just stay in place, firing shots on an interval.
As mentioned above, Move To Player doesn't ever return true, so once the final Wait node in the lower right completes and returns true, this satisfies the condition of the Parallel Selector node, thus satisfying all conditions of the lower Sequence node, which satisfies the condition of the Selector node, thus satisfying the conditions of the upper Sequecne node. For a moment, pretend I did not have the Repeater node in place - once the upper Sequence node returns true to the Start node, the behavior will tree will complete and no further logic from the tree will take place.
Because I wanted this logic to continue as long as the enemy is alive, that is why I have included the Repeater node at the top of the tree. So now, once the upper Sequence node returns true, this "resets" the graph and will again evaluate the full thing top-to-bottom, left-to-right.
What this looks like in practice is after the 1 second "repositioning" maneuver, if the enemy is still within range of the player it will again stop, flash pink for a second and fire a shot. However, if after repositioning the player is out of range of the enemy, the enemy will chase the player until the player is back in range, then go through the shooting sequence.
I was so happy with how this one came out and I was really excited that I was able to reuse so many of these building blocks from the exploding UFO to create something completely unique.